
This 3-hour walking tour in Glasgow’s city centre (starting at Royal Exchange Square at 10:30am) is a small-group way to get your bearings fast. You’ll move through major civic spots like George Square and end near Glasgow Cathedral, with plenty of stops in between.
Two things I especially liked are the personal, small-group feel (up to 15 people) and the way the guide brings the city to life as you walk. The tour also hands you an easy set of next steps for your trip, so you don’t just see sights—you know what to do after.
The main drawback to consider is simple: it’s mostly outdoors walking. Glasgow weather is fickle, so you’ll want to be ready for cold, rain, or wind.
This tour is a great fit for first-timers, anyone who likes history with humor, and travelers who want practical local ideas without having to plan every stop.
- Key Points
- What you’re really buying for .64
- Tour pace and logistics: where to start and how it flows
- Group size: why 15 people changes the experience
- The route: every stop and what makes it memorable
- Start: meet your guide and the idea of Mother Glasgow
- Stop 0/first landmark: the hidden history of a landmark building
- Stop 1: Duke of Wellington Statue (the cone-wearing commander)
- Stop 2: George Square (civic heart and a rooftop oddity)
- Stop (Georgian Glasgow gem): pig-like gluttony and a club story
- Stop (commercial to industrial to renaissance): the growth story tied to Mother Glasgow
- Stop 3: Trongate (Tron Kirk Steeple and a hidden entertainment venue)
- Stop 4: Tolbooth Steeple (Glasgow Cross and the epicentre feeling)
- Stop 5: St. Mungo at High Street (street art that you’ll remember)
- Stop (Provand’s Lordship area): four special buildings and a blue one
- Stop 6: Glasgow Cathedral (medieval Gothic with the Necropolis behind)
- What the guide adds (and why it shows in the reviews)
- Hidden gems vs big landmarks: how to get the most out of it
- Where this tour fits best in your Glasgow trip
- Accessibility and practical considerations
- Cancellation and booking reality
- Should you book this Glasgow walking tour?
- FAQ
- Where does the tour start and end?
- How long is the tour?
- What time does it begin?
- How big is the group?
- Is there an admission fee for the stops?
- Is the tour in English?
- Is a mobile ticket used?
- What is the cancellation policy?
- The Best Of Glasgow!
- More Walking Tours in Glasgow
- More Tours in Glasgow
- More Tour Reviews in Glasgow
Key Points
- Small-group limit (15 max) makes the stories feel personal, not broadcast.
- 3 hours is long enough for real context, but short enough to keep your day flexible.
- Landmark-to-hidden-gem route mixes big squares with overlooked details.
- Free admission at the stops keeps the cost from creeping up.
- Local tips after the tour help turn your sightseeing into a full itinerary.
- Comfort and weather matter since you’ll spend much of the tour outside.

👉 See our pick of the 7 Top-Rated Glasgow Shore Excursions
What you’re really buying for $16.64


At about $16.64 per person for roughly 3 hours, this is strong value for a city-center experience. You’re not just paying for a route—you’re paying for a guide who can connect buildings, neighborhoods, and traditions into one clear story of how Glasgow grew, shifted, and reinvented itself.
You also get some cost control: the itinerary includes stops with free admission, so you’re not racking up extra entry fees while you’re walking. If you’re the kind of traveler who wants maximum payoff per hour (who isn’t), this tour’s pace and focus are built for that.
And because it’s run as a mobile ticket experience in English, it’s easy to show up, scan in, and get moving without extra fuss.
You can also read our reviews of more walking tours in Glasgow


Tour pace and logistics: where to start and how it flows
You meet at 8–10 Royal Exchange Square, Glasgow G1 3AB at 10:30am. The tour ends at Glasgow Cathedral, Castle St, Glasgow G4 0QZ, with the meeting point described as inside Glasgow Cathedral on the north-west side (and the tour can finish outside depending on COVID restrictions on group size and mask-wearing inside).
Timing matters here. With multiple short stops, the tour stays energetic, and you’ll get quick context before you move on. You’re looking at lots of “look up, notice that, then keep walking” moments—exactly the kind of structure that helps the city stick in your mind.
It’s also described as near public transportation, which is helpful if your day in Glasgow includes other stops before or after.
Group size: why 15 people changes the experience
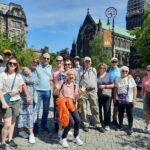
The cap of 15 travelers is not a small detail. In reviews, I kept seeing the same theme: the guide learns names, checks in for comfort, and keeps the storytelling aimed at the whole group. In a city where street noise can be intense, having fewer people also helps everyone hear.
If you’re traveling with kids, this small-group setup can be a plus. One family-friendly note from travelers: a baby and stroller were handled smoothly. That’s the kind of real-world comfort you can’t always count on with bigger groups.
The route: every stop and what makes it memorable
Start: meet your guide and the idea of Mother Glasgow
The tour kicks off by framing Glasgow as more than stone and streets. You’re introduced to Mother Glasgow, described like the city’s powerhouse—captured by the self-styled Glasgow Gander persona. That framing does something useful: it gives you a mental thread you can follow as you move from building to building.
You also get the feeling the guide has done this route a lot, and he knows where people look, pause, and miss things.


Stop 0/first landmark: the hidden history of a landmark building
Early on, you’ll learn hidden history tied to a landmark building, plus the personality behind the city story: the Glasgow Gander. This matters because it sets your expectations for the rest of the walk.
A tour like this works best when it tells you what to notice. Here, you’re basically being trained to read Glasgow as you go.
Stop 1: Duke of Wellington Statue (the cone-wearing commander)
At the Duke of Wellington Statue, you’ll see the story behind the tradition of the cone-wearing commander. It’s the kind of small, humorous detail that’s easy to miss if you’re just taking photos.
What I like about a stop like this is that it shows how Glaswegians keep history playful. It also gives you a break from heavier “big-city history” beats while still being part of the same narrative.
Time: about 5 minutes
Admission: free
Stop 2: George Square (civic heart and a rooftop oddity)
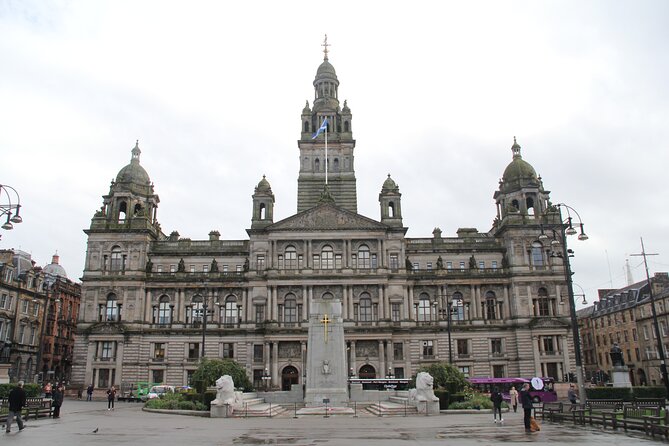
Next is George Square, guided as the symbolic heart of Glasgow. You’ll watch for an unpredictable movement of a rooftop ship and learn about Glasgow City Chambers, described as one of northern Europe’s finest civic buildings.
This is a classic city-center “anchor” stop. You get the formal grandeur, but you’re also encouraged to notice the quirky bits that make the place feel lived-in.
Time: about 10 minutes
Admission: free
Stop (Georgian Glasgow gem): pig-like gluttony and a club story
You’ll then hit a often-overlooked gem of Georgian Glasgow. Travelers are clearly enjoying the humor here—one stop includes the story of a club where pig-like gluttony was encouraged.
This kind of detail is more than gossip. It helps you understand the social side of a city’s history, not just its architecture.
Time: not specified
Stop (commercial to industrial to renaissance): the growth story tied to Mother Glasgow
In the shadow of a striking city-centre building, you hear a firm story of Glasgow’s evolution: it grew as a commercial and industrial city, had a decline, then a renaissance. You also connect that to the idea of Mother Glasgow and her ongoing impact.
This part is likely the emotional center of the tour: it’s where the buildings stop being landmarks and start being evidence. If you want your sightseeing to have meaning, this is the payoff.
Time: not specified
Stop 3: Trongate (Tron Kirk Steeple and a hidden entertainment venue)
On Trongate, near the 16th-century Tron Kirk Steeple, you’ll hear the story of an incredible hidden entertainment venue—described as full of “glory and grottiness.”
This stop works because it turns a street into a timeline. Even without entering anywhere, you leave with a clearer sense of how entertainment, commerce, and street life have layered over each other.
Time: about 10 minutes
Admission: free
Stop 4: Tolbooth Steeple (Glasgow Cross and the epicentre feeling)
Next is Tolbooth Steeple, beneath the 17th-century structure where multiple historic streets meet. You’ll hear the “eye-popping” history of Old Glasgow at its epicentre—Glasgow Cross.
If you’ve walked past major junctions before, you know how often they become background. This kind of stop teaches you to treat the intersection like a character in the city story.
Time: about 10 minutes
Admission: free
Stop 5: St. Mungo at High Street (street art that you’ll remember)
At St. Mungo at High Street, you’ll see Glasgow’s famous son hiding in plain sight: one of the best pieces of street art you’ll ever see (as described on the tour).
This is also a smart “modern Glasgow” moment. After layers of Georgian and Victorian story beats, you get a present-day visual reminder that Glasgow’s identity is still evolving.
Time: about 2 minutes
Admission: free
Stop (Provand’s Lordship area): four special buildings and a blue one
Across from Provand’s Lordship (the city’s oldest house, described as 15th century), you’ll take in four quite special buildings, including a small blue one said to be sometimes used for inter-dimensional travel.
The exact details of those buildings aren’t fully listed in the schedule you provided, but the point is clear: this is where the tour gets delightfully specific. You’ll start noticing that the route is designed to reward curiosity, not just sightseeing.
Time: not specified
Stop 6: Glasgow Cathedral (medieval Gothic with the Necropolis behind)
Finally, Glasgow Cathedral is presented as the city’s architectural pinnacle, a medieval Scottish Gothic cathedral with the Necropolis as a backdrop. Depending on current rules (including COVID-era group size and mask-wearing), the tour may finish outside the cathedral.
Even as a quick stop, a cathedral like this changes the way you read everything you saw earlier. It’s where the city’s long timeline becomes visible in stone, height, and style.
Time: about 10 minutes
Admission: free
What the guide adds (and why it shows in the reviews)
This tour is strongly shaped by the guide’s personality—warm, enthusiastic, and packed with stories. Multiple travelers mention infectious passion, clear communication, and the guide sending a comprehensive recommendations list after the tour.
A few practical perks also come up:
- The guide helps you see details you’d miss on your own.
- There are props and shared photos mentioned by travelers.
- The pace stays friendly and easy for different group types.
- In tricky moments like crowded streets, the guide checks that everyone can hear.
One review also highlights that even if people drop out last minute, the tour doesn’t necessarily cancel, which can be a relief if you’re on a tight schedule.
Hidden gems vs big landmarks: how to get the most out of it
A quick tip from how this tour is designed: don’t just aim your camera at the obvious. The best moments are likely the quick, quirky ones—cone-wearing Wellington, rooftop ship movement, the hidden entertainment venue, the street art, the “small blue” building.
If you’re the sort of traveler who likes to take notes, bring something to write with. One traveler specifically said to bring pen and paper because there’s a lot of information.
Also: dress for walking. Reviews mention cold and rainy conditions, so expect that the tour still runs, but your comfort will depend on your gear.
Where this tour fits best in your Glasgow trip
I’d use this as an early tour if you can. It gives you the language to understand what you’re seeing later: why certain streets matter, how the city’s identity formed, and where you might want to spend more time.
If you only have a day or two, this works well as your core orientation. If you have more time, it still helps you plan—especially with that guide-style list of museums, pubs, and other experiences travelers mention receiving.
Accessibility and practical considerations
Service animals are allowed, and the tour is near public transportation. “Most travelers can participate,” which suggests it’s not a specialized hike.
That said, it’s still a walking tour with multiple stops, so bring shoes you can stand in and walk in comfortably for about 3 hours.
Cancellation and booking reality
Free cancellation is available. You can cancel up to 24 hours in advance for a full refund, and changes within 24 hours aren’t accepted. If your dates are flexible, you’ll probably feel comfortable booking.
The tour is often booked about 36 days in advance on average, so if you’re traveling during peak weeks, you’ll want to lock in your slot earlier.
Should you book this Glasgow walking tour?
Book it if you want:
- A local take on the city with humor and clear history
- A small-group pace
- A route that includes both major landmarks and quick side stops
Skip it (or think twice) if you dislike walking in the weather or you only want museum-style, inside-only stops.
If you’re a first-timer or you just want your Glasgow day to feel organized and fun, this is the kind of tour you’ll wish you’d done sooner.
Gander Walking Tours in Glasgow
FAQ
Where does the tour start and end?
It starts at 8–10 Royal Exchange Square, Glasgow (G1 3AB) and ends at Glasgow Cathedral, Castle St, Glasgow (G4 0QZ).
How long is the tour?
The tour is about 3 hours (approx.).
What time does it begin?
The start time is 10:30am.
How big is the group?
The maximum group size is 15 travelers.
Is there an admission fee for the stops?
The itinerary lists stops with free admission.
Is the tour in English?
Yes, it’s offered in English.
Is a mobile ticket used?
Yes, a mobile ticket is included.
What is the cancellation policy?
You can cancel for a full refund if you cancel at least 24 hours before the experience starts. If you cancel less than 24 hours before, you won’t get a refund.