
If you’re planning a trip to Hobart and want to get a well-rounded taste of what this vibrant city has to offer, a tour that combines Mt Wellington’s breathtaking vistas with the fascinating, sometimes provocative, exhibits at MONA sounds like a win. While I haven’t personally taken this exact tour, based on reviews and the itinerary, I can tell you it’s a solid choice for those who love a mix of natural beauty and contemporary culture.
What really stands out is the guided experience — you’ll get insightful commentary about the mountain’s ecosystems and Hobart’s history, plus the chance to explore MONA’s unique collection with an expert. Plus, the inclusion of ferry tickets and free entry to MONA adds a lot of value.
On the flip side, it’s worth considering the weather unpredictability at Mt Wellington, which can sometimes cloud the views or make the experience less enjoyable. But if you’re flexible and prepared for a bit of chill, this tour can be a rewarding way to see Hobart from multiple angles. It’s especially suited for travelers who enjoy a bit of adventure and eclectic art, and who prefer a structured, all-in-one day out.
- Key Points
- The Itinerary: What to Expect and Why It Matters
- Stop 1: Mount Wellington — The Summit of Scenic Views and Unique Ecosystems
- Stop 2: Cascade Gardens — A Snapshot of Hobart’s Historic Green Space
- Stop 3: MONA – A World of Art and Curiosity
- Stop 4: Cascades Female Factory Historic Site — A Brief but Insightful Stop
- The Practicalities: What You Need to Know
- The Experience’s Highlights:
- The Potential Downsides:
- Who Would Love This Tour?
- Frequently Asked Questions
- Would I Recommend It?
- More Tours in Hobart
- More Tour Reviews in Hobart
- More Hobart experiences we've covered
Key Points
- Balanced itinerary blending nature and art gives a well-rounded Hobart experience.
- Knowledgeable guides enhance the tour with engaging commentary on ecosystems and local history.
- Inclusion of MONA entry and ferry adds to the value, making it more than just a sightseeing trip.
- Weather can be unpredictable at Mt Wellington — bring warm, layered clothing.
- Group size is limited to 45, keeping the experience intimate enough for questions and personal attention.
- Ideal for curious travelers interested in diverse attractions without the hassle of planning multiple day trips.
The Itinerary: What to Expect and Why It Matters
Planning more time in Hobart? We've covered other experiences worth considering.
Stop 1: Mount Wellington — The Summit of Scenic Views and Unique Ecosystems
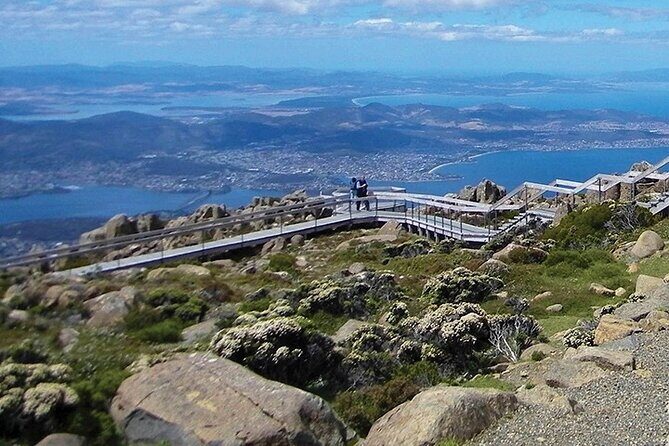
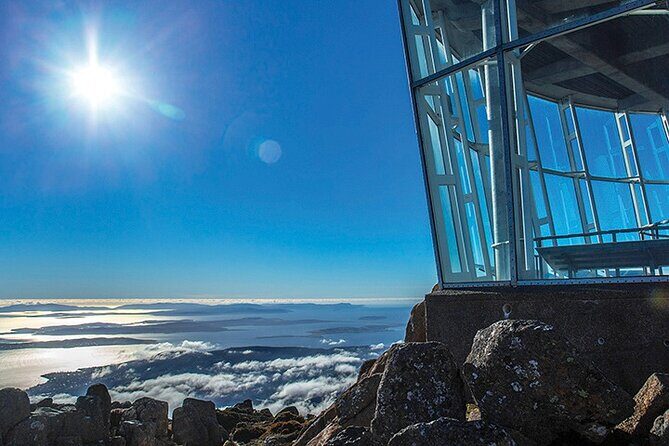
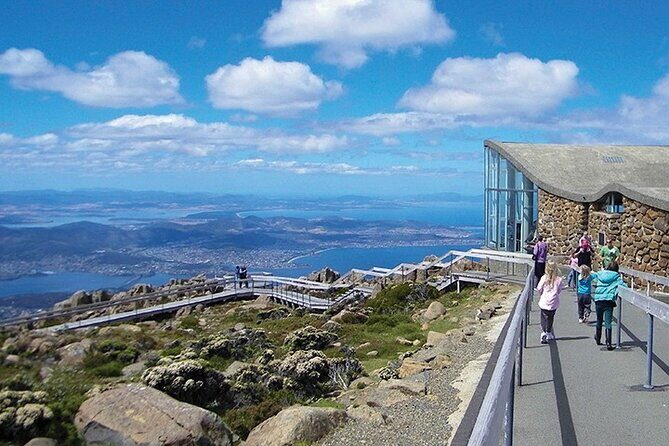
Starting around 9:00 am, the tour kicks off with a drive up to the top of Mount Wellington, which is arguably the highlight for many. The ascent takes about 45 minutes, but what you’re really after are the views and the environment. You’ll pass through various eco systems that showcase the mountain’s alpine conditions — think rugged rocks, hardy plants, and the famous Organ Pipes rock formation that you’ll see along the way.
Many reviews mention the capricious nature of the weather here. Some travelers get incredible clear views, while others find the clouds roll in, obscuring the horizon. As one reviewer pointed out, “The clouds started to part for us, and we saw a beautiful view,” but another lamented that “The weather didn’t cooperate… very windy, cold, and no view.” It’s a reminder to dress warmly and be prepared for sudden weather shifts, especially at higher elevations.
What makes this stop valuable isn’t just the views — it’s the experience of standing in a harsh, windswept environment that’s so different from Hobart’s cityscape. Your guide will explain the mountain’s ecosystems, giving context to the flora and fauna adapted to these conditions. Some visitors mention how cold and windy it can be, even in late November, so packing a hat, gloves, and layers is key.
Stop 2: Cascade Gardens — A Snapshot of Hobart’s Historic Green Space
Next, the tour moves to the Cascade Gardens, which date back to 1827. These gardens are a peaceful spot to soak in some history and natural beauty. They’re particularly photogenic, and you’ll see remnants of the Cascades Female Factory nearby, giving a glimpse into Hobart’s history as a convict settlement.
Visiting here is a nice breather after the mountain’s wild environment. Reviewers appreciate these gardens for their tranquility and historic significance. As one noted, “View the remains of the Cascades Female Factory — a one-time female prison,” which offers a glimpse into the city’s layered past.
Stop 3: MONA – A World of Art and Curiosity
The most anticipated part of the tour for many is the visit to MONA, Australia’s most talked-about modern art museum. The journey here includes a scenic ferry cruise along the Derwent River, which in itself earns praise for being relaxing and scenic. Once you arrive, the museum’s architecture impresses with its modern design, carved out of sandstone.
MONA houses Australia’s largest private collection, featuring everything from Egyptian mummies to provocative contemporary pieces. Some reviews mention that “it’s like Marmite — love it or hate it,” but everyone agrees it’s undeniably unique. The exhibits can be strange, edgy, or even unsettling, but they’re also thought-provoking and often beautifully crafted.
You’ll spend about four hours here, which, given the size of the collection, is a good amount of time to explore at your own pace. The ticket is included, and you can even change your ferry return time if needed. It’s a chance to see art that pushes boundaries, and the building’s architecture adds to the experience — many say it’s worth visiting just to see the space itself.
Stop 4: Cascades Female Factory Historic Site — A Brief but Insightful Stop
The tour concludes with a quick exterior look at the Cascades Female Factory, giving a sobering view of Hobart’s convict past. Your driver guide will share stories about the women imprisoned there, offering a glimpse into a difficult part of local history. This part is short, about five minutes, but meaningful for those interested in social history.
- Maria Island Cruise and Guided Walk Day Tour with Lunch and Drinks
- Bruny Island Food, Sightseeing, Guided Lighthouse Tour & Lunch
- Day Tour in Mt. Field, Mt. Wellington, Bonorong Wildlife Sanctuary and Richmond
- Port Arthur and Tasman Sights with Harbour Cruise
- Wineglass Bay & Freycinet NP Full Day Tour from Hobart via Richmond Village
- Historic Battery Point
The Practicalities: What You Need to Know
The tour price is $101.85 per person, which might seem steep at first glance. But when you consider the admission to MONA, the ferry ride, and the guided commentary, it offers good value for a comprehensive day out. The entire experience lasts about 7.5 hours, making it a full day without feeling rushed.
Transportation is provided in an air-conditioned vehicle, with pickup included — a real plus for convenience and comfort. The group size caps at 45, so you’re not lost in a crowd, and the guide’s reviews frequently mention their knowledge and engaging style.
One caveat is the weather dependency — a clear day amplifies the experience at Mount Wellington and the views from the mountain are often cited as a highlight. If poor weather cancels the trip, you’ll be offered an alternative date or a full refund.
The Experience’s Highlights:
- Guided insights about the mountain’s ecosystems and Hobart’s history
- Scenic ferry ride to MONA with beautiful river views
- Diverse collection of art ranging from ancient artifacts to contemporary pieces
- Convenience of transportation and entry tickets bundled together
The Potential Downsides:
- Weather unpredictability at Mount Wellington can limit the views
- Some travelers mention the tour feeling rushed, especially around the mountain and MONA
- Limited time at each stop might leave some wanting more, particularly at MONA
- The bus temperature may not be perfectly regulated, so dress accordingly
Who Would Love This Tour?
This tour is a great pick for curious explorers who want a multi-layered experience of Hobart in a single day. It suits those who appreciate nature, history, and art and don’t mind a bit of chill on the mountain. The inclusion of ferry tickets and museum entry makes it feel like good bang for your buck, especially for travelers who prefer everything organized and taken care of.
It’s also well-suited to first-time visitors wanting to get an overview of Hobart’s highlights without the hassle of planning multiple excursions. If you’re someone who enjoys guided storytelling, scenic drives, and discovering quirky, thought-provoking art, then this tour will resonate with you.
kunanyi/Mt Wellington Tour and MONA Admission
“The clouds started to part for us, and we saw a beautiful view. The Mona Museum was very interesting.”
Frequently Asked Questions

Is this tour suitable for all weather conditions?
The tour relies on good weather, especially at Mount Wellington. If the weather turns poor, the trip may be canceled or rescheduled, so it’s wise to check the forecast. Bring warm, layered clothing just in case.
How long do we spend at each stop?
You’ll have about 1 hour 15 minutes at Mount Wellington, 15 minutes at Cascade Gardens, around 4 hours at MONA, and a brief 5-minute exterior stop at Cascades Female Factory.
Does the tour include transportation?
Yes, it includes air-conditioned transport with pickup from your hotel, and the return ferry ticket to MONA is included.
Are food and drinks available during the tour?
No, lunch isn’t included. You might want to bring snacks or plan to eat at MONA or nearby after the tour.
Can I change the ferry return time?
Yes, your ticket allows some flexibility to choose your ferry return, which is handy if you want to linger longer at MONA.
What’s the group size?
The maximum is 45 travelers, which helps keep the experience comfortable and allows for better interaction with guides.
Is this tour family-friendly?
While not explicitly marketed as a family tour, the attractions are suitable for most ages interested in nature and art. Just note the walk around MONA and the outdoor areas at Mount Wellington could be challenging for very young children.
How much does the tour cost?
It’s priced at $101.85 per person, which covers most major expenses including entry to MONA and ferry tickets. The value depends on your interest in the stops included.
What kind of guides can I expect?
Reviews highlight guides who are knowledgeable, engaging, and able to deliver continuous commentary, enhancing the overall experience.
If you’re after a comprehensive, well-organized day exploring Hobart’s natural and cultural treasures, this Mt Wellington and MONA tour offers a lot. The combination of scenic mountain views, historic gardens, and modern art makes for a varied experience that appeals to many travelers. Just remember that weather can be unpredictable, so dress warmly and plan for some variability.
This tour is ideal for those who don’t want to fuss with logistics and prefer to sit back and learn from guides while seeing the city from different perspectives. It’s a particularly good fit for curious minds, art lovers, and nature enthusiasts looking to get the most out of a day in Hobart.
Would I Recommend It?
Absolutely, especially if you’re interested in a full, guided day but keep your expectations flexible regarding the weather and the pace. You’ll walk away with memories of stunning landscapes and a taste of MONA’s eclectic exhibits. Perfect for making the most of your Hobart visit without devoting multiple days to the task.
Enjoy your trip to Hobart — and don’t forget your layers!
More Tours in Hobart
More Tour Reviews in Hobart
More Hobart experiences we've covered
- Hobart Highlights & Mount Wellington Shore Excursion
- 5-Day Best of Tasmania Tour from Hobart
- kunanyi/Mt Wellington Tour and MONA Admission
- Derwent River Historic Harbour Cruise From Hobart
- Hobart: 2.5-hour Iron Pot Lighthouse Cruise
- Hobart: 24-Hour Hop-on Hop-off Sightseeing Bus Ticket
- Hobart Hop-On Hop-Off Bus & kunanyi/Mt Wellington Tour
- From Hobart: Three Capes Walking Tour – 4 Days
- 7-Day Super Value Tour of Tasmania: Explore Tasmania’s West and East Coasts
- 10 Days Ultimate Guided Tour of Tasmania – Comfort Tour
- Southwest Tasmania Wilderness Experience: Fly Cruise and Walk Including Lunch
- 48 Hour Hobart City Hop-On Hop-Off Tour